
Product Design Workflow for High-Performing SaaS Teams
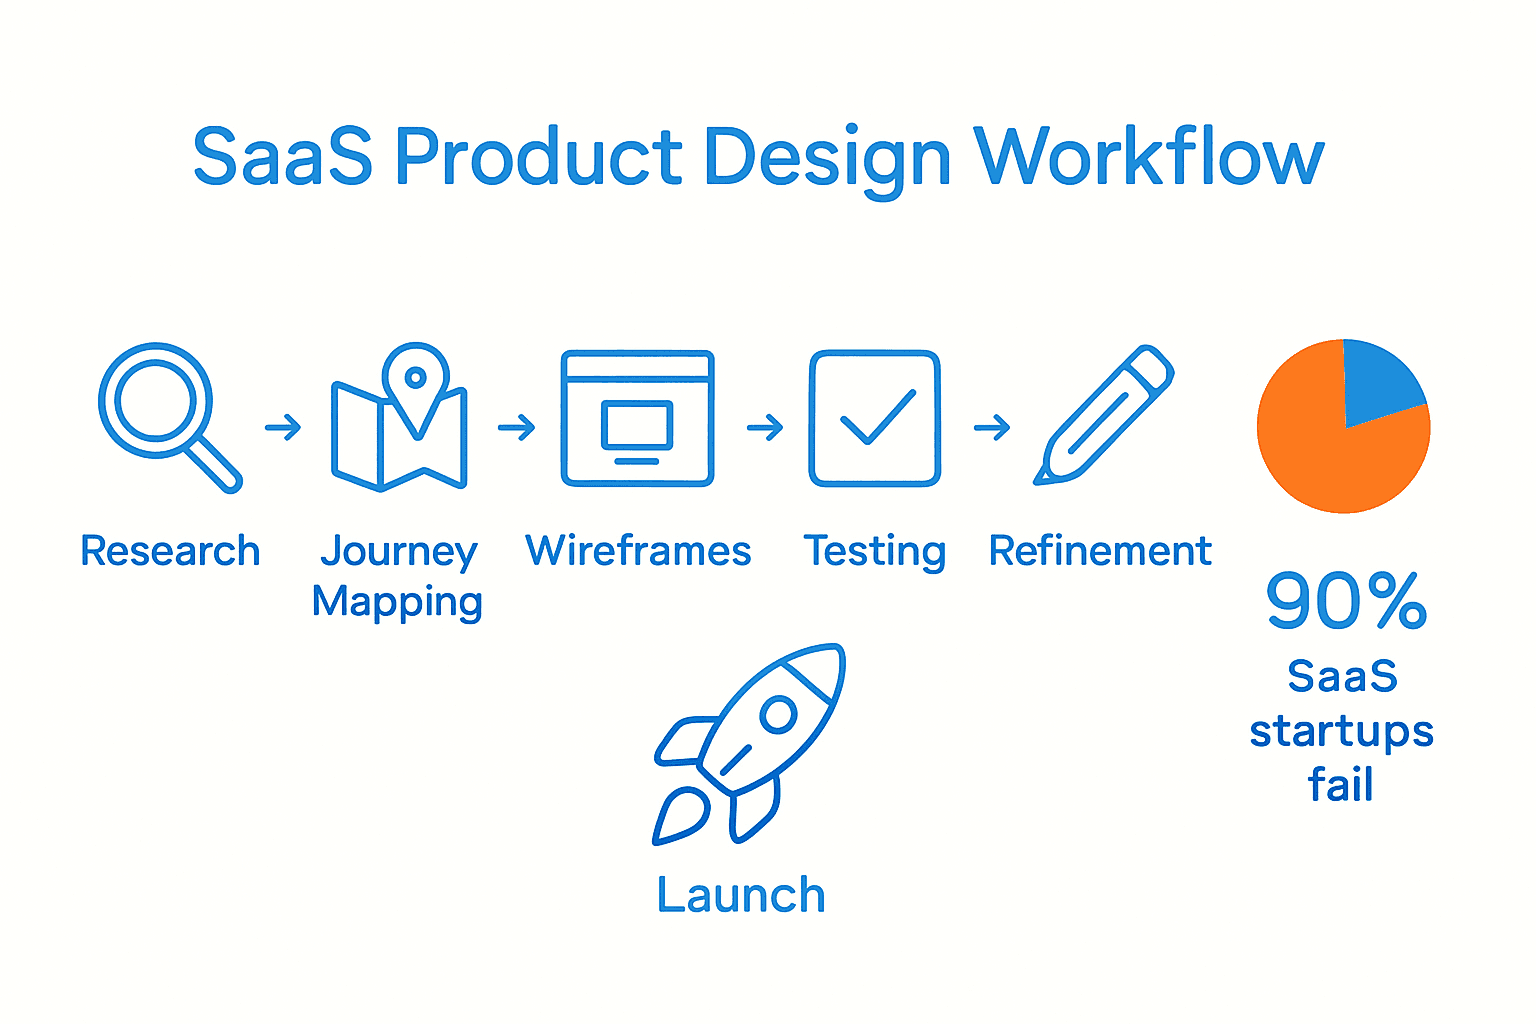
Did you know that over 90% of SaaS startups fail because they miss the mark on user needs and product design? Building a product that delights users while meeting business goals is no small feat. From defining what matters most to your audience to monitoring real results after launch, the right process can help you create software that stands out and keeps customers coming back.
Table of Contents
- Step 1: Define Project Goals And User Needs
- Step 2: Map User Journeys And Prioritize Features
- Step 3: Create Wireframes And Prototype Core Flows
- Step 4: Test Usability And Gather Actionable Feedback
- Step 5: Refine Designs And Align With Brand Guidelines
- Step 6: Launch Solutions And Monitor Performance
Quick Summary
| Key Point | Explanation |
|---|---|
| 1. Clearly define goals and user needs | Conduct thorough research to understand user behaviors and align design efforts with business objectives. |
| 2. Map user journeys for feature prioritization | Visualize the user journey and assess which features will enhance user experience and impact business value. |
| 3. Create low-fidelity wireframes quickly | Sketch initial wireframes to illustrate core flows, focusing on speed and rapid iteration rather than perfection. |
| 4. Conduct usability tests to gather feedback | Test prototypes with real users to collect actionable insights, focusing on both qualitative and quantitative data. |
| 5. Establish performance tracking post-launch | Implement analytics tools to monitor user behavior and performance, ensuring continuous product improvement and adaptation. |
Step 1: Define project goals and user needs
In this step, you will clarify the fundamental objectives and user requirements that will guide your entire product design workflow. Understanding user behaviors and aligning design efforts with business goals is critical for creating a successful SaaS product.
To begin, conduct comprehensive user research through interviews, surveys, and direct interactions. According to Abbacus Technologies, understanding user behaviors, needs, and motivations is essential in defining project goals that truly resonate with your target audience.
Start by mapping out your primary business objectives alongside potential user pain points. NASSCOM Community emphasizes the importance of establishing clear product ideas and aligning design efforts with business objectives.
Key activities in this research phase include:
- Conducting user interviews
- Creating user personas
- Identifying specific user problems
- Documenting measurable project goals
Pro Tip: Document everything. Detailed research notes will serve as a crucial reference point throughout your design process.
Once you have gathered insights and defined clear goals, you will be ready to move into the next phase of user journey mapping and interaction design. The groundwork you establish here sets the foundation for a user-centered product that solves real problems.
Step 2: Map user journeys and prioritize features
In this step, you will transform your initial research insights into a comprehensive understanding of how users interact with your product and determine which features will deliver the most significant impact. Your goal is to create a strategic roadmap that optimizes user experience and business value.
According to Abbacus Technologies, mapping end-to-end user experiences is crucial for highlighting pain points and informing feature prioritization. Begin by visualizing the entire user journey from initial contact through long-term engagement.
To effectively prioritize features, leverage advanced research techniques. ArXiv Research suggests applying methods like MaxDiff in user experience research to help prioritize product features before making significant engineering commitments.
Key steps in mapping user journeys include:
- Documenting each user interaction point
- Identifying emotional and functional user needs
- Scoring potential features based on user impact
- Creating a visual journey map with clear progression stages
Pro Tip: Use a collaborative whiteboard tool to make your journey mapping interactive and easy to iterate.
User Journey Optimization becomes critical at this stage. By understanding how users move through your product, you can design more intuitive experiences that reduce friction and increase engagement.

Once you have mapped the user journey and prioritized features, you will be prepared to move into detailed interaction design and prototyping. This strategic approach ensures your product development remains focused on delivering genuine user value.
Step 3: Create wireframes and prototype core flows
In this step, you will transform your user journey insights into visual blueprints that outline how users will interact with your product. Your goal is to create low fidelity representations that capture the essential functionality and user experience before investing in detailed design.
According to Abbacus Technologies, translating user insights into tangible concepts involves crafting information architecture and interaction flows tailored specifically to SaaS contexts. Start by sketching out the core screens and interaction pathways that represent your primary user scenarios.
Why & How to Use Figma Make provides excellent context for digital prototyping tools that can streamline this process. Begin with basic geometric shapes and simple annotations to represent interface elements without getting bogged down in visual details.
Recent research from ArXiv highlights emerging frameworks like DesignGPT that facilitate multi-agent collaboration in design, enhancing the creation of wireframes and prototypes. This suggests leveraging collaborative tools that enable rapid iteration and team feedback.
Key steps in creating wireframes include:
- Focusing on layout and core interaction patterns
- Using grayscale and simple geometric shapes
- Annotating key functionality and user flows
- Creating multiple iterations quickly
Pro Tip: Speed trumps perfection. Aim to generate multiple rough wireframes quickly rather than obsessing over details.
Once you have initial wireframes, you will prepare to validate these designs through user testing and feedback. This approach ensures your product concept meets actual user needs before significant development investment.
Step 4: Test usability and gather actionable feedback
In this step, you will systematically evaluate how real users interact with your product prototype and collect meaningful insights that will drive critical design improvements. Your objective is to transform subjective impressions into concrete, actionable design recommendations.
According to Abbacus Technologies, conducting usability evaluations provides quantitative evidence of user behavior through methods like heatmaps and click path analysis. This approach transforms abstract user experiences into measurable data points.
Usability Checklist - Five Critical Factors suggests structuring your testing methodology to capture comprehensive user interaction insights. Begin by recruiting a diverse group of participants who represent your target user segments.
Recent research from ArXiv emphasizes the importance of supporting design systems that capture stable design knowledge while meeting evolving user needs. This means your usability testing should focus not just on current functionality but potential future adaptations.
Key steps in usability testing include:
- Designing clear test scenarios
- Observing user interactions without leading questions
- Recording both quantitative metrics and qualitative feedback
- Identifying unexpected user behaviors
Pro Tip: Encourage users to think aloud during testing to reveal their mental models and decision making processes.
Once you have gathered comprehensive feedback, you will synthesize insights and prepare for the next iteration of your product design. This empirical approach ensures your final product genuinely meets user expectations and solves real problems.
Step 5: Refine designs and align with brand guidelines
In this step, you will transform your functional prototype into a cohesive visual design that communicates your brand identity while maintaining optimal user experience. Your goal is to create a design that feels both professional and uniquely representative of your product’s personality.
According to Abbacus Technologies, balancing functionality with usability ensures that every feature aligns with user goals and maintains consistency with brand guidelines. This means your design must be more than aesthetically pleasing it must be purposeful.
How Fast Design Debt Forms When Design Responsibility Spreads Too Thin highlights the importance of maintaining design coherence throughout your product development process. Start by creating a comprehensive design system that documents color palettes, typography, interaction states, and visual hierarchy.
Research from ArXiv emphasizes synthesizing knowledge related to design systems to support their creation and maintenance. This means developing a living document that can evolve with your product while maintaining core brand principles.
Key steps in design refinement include:
- Creating a consistent color and typography system
- Defining clear interaction states and animations
- Establishing responsive design principles
- Documenting design rationale and usage guidelines
Pro Tip: Treat your design system as a product itself something that requires ongoing care and strategic evolution.
Once you have refined your designs and established brand guidelines, you will be prepared to create high fidelity mockups and prepare for development handoff. Your goal is a design that feels both intentional and intuitive.
Step 6: Launch solutions and monitor performance
In this step, you will transition your meticulously designed product from prototype to active solution while establishing robust performance tracking mechanisms. Your goal is to create a feedback loop that continuously validates and improves your product experience.
According to Abbacus Technologies, leveraging data analytics provides objective insights into user behavior and product performance. This means implementing comprehensive tracking tools that go beyond surface level metrics.
Recent research from ArXiv highlights the importance of integrating knowledge management services in collaborative product design using cloud computing infrastructure. This approach enables real time access to performance data and supports continuous product optimization.
Key steps in launching and monitoring your solution include:
- Configuring comprehensive analytics platforms
- Setting up user behavior tracking
- Establishing performance benchmarks
- Creating automated reporting dashboards
- Defining key performance indicators
Pro Tip: Design your monitoring strategy before launch. Retroactive tracking often misses crucial early insights.
As you launch and begin tracking performance, remember that data is a conversation starter not the final word. Your ongoing mission is to translate these metrics into meaningful product improvements that enhance user experience.
Here’s a summary of the key activities and objectives for each step:
| Step | Main Objective | Key Activities |
|---|---|---|
| Define goals & needs | Align with user & business goals | User interviews User personas Problem identification Set measurable goals |
| Map journeys & prioritize | Optimize user flow & feature impact | Journey mapping Feature scoring Interaction documentation |
| Create wireframes & prototypes | Visualize core product flows | Wireframe sketches Interaction annotation Rapid iteration |
| Test usability & gather feedback | Validate design with real users | Conduct usability tests Capture feedback Track metrics |
| Refine design & align brand | Blend brand and usability | Design system creation Document guidelines Ensure consistency |
| Launch & monitor | Track performance & improve | Configure analytics User tracking Regular reporting |
Transform Your SaaS Product Design Workflow Into a Growth Engine
The article highlights key challenges SaaS teams face such as disconnected user journeys, unclear positioning, and the need for strategic feature prioritization to drive user engagement and business goals. If you recognize the frustration of trying to create seamless user experiences while managing evolving product demands, The Good Side Oy is here to help. Our seasoned designers specialize in turning scattered ideas into cohesive, high-performing SaaS products by integrating user research, UI/UX design, and end-to-end journey optimization tailored for your business goals.

Boost your product’s activation and conversions today by leveraging flexible design partnerships that scale with your needs. Start with a free design audit and quickly access experts who understand concepts like user journey mapping, usability testing, and design system creation. Explore how our strategic design services align with your product goals by visiting The Good Side and see how we help SaaS teams achieve measurable growth and streamlined go-to-market success. Ready to refine your product design workflow and unlock better performance? Speak with our team and take the first step now.
Frequently Asked Questions
How can I define project goals and user needs for my SaaS product?
Start by conducting user research through interviews and surveys to understand behaviors and needs. Aim to identify specific user pain points and align these insights with measurable business objectives within 2–4 weeks.
What steps should I take to map user journeys effectively?
Document each interaction point users have with your product and identify their emotional and functional needs. Create a visual journey map that outlines the user experience, aiming to complete this process within 2–3 iterations of feedback.
How do I prioritize features after mapping user journeys?
Score potential features based on their impact on user experience and business goals. Use methods like feature scoring systems to identify which features to develop first and aim to finalize this prioritization in 1–2 weeks.
What is the best approach to create wireframes for my SaaS product?
Focus on developing low-fidelity wireframes that represent core screens and interaction flows. Utilize simple geometric shapes and quick iterations to finalize your wireframes in approximately 1–3 weeks.
How can I conduct usability testing and collect actionable feedback?
Design clear test scenarios and observe real users as they interact with your prototype. Record both quantitative data and qualitative insights to synthesize feedback and iterate on your design within 1–2 weeks after testing.
What should I include in my design system to ensure brand alignment?
Create a comprehensive design system that outlines color palettes, typography, and interaction states. Document these guidelines thoroughly to maintain consistency and aim to complete the system within 2–4 weeks.
Recommended
- Step by Step UI/UX Process for SaaS Product Success | The Good Side Blog
- Step by Step UI/UX Process for SaaS Product Success
- Ohjelmistokehityksen tukeminen designin avulla | The Good Side Blog
- Palvelumuotoilu tuoteomistajan tukena | The Good Side Blog
- Outdoor Group Games For Adults Perfect for Team Building
- Blog | Design and Development Insights from Markupus